
Updated 3/10/2023
One of the most common issues when remodeling your home is figuring out how to cut crown molding with a miter saw.
If you’ve decided to take this project upon yourself, this guide is for you!
The simple addition of crown molding adds so much character to a home and puts that finishing touch on any room.
But what happens when you start a project only to realize you don’t have all of the tools required?
You may find yourself at Home Depot or Lowes – again – staring down an aisle of miter saws as we did!
How to choose? How do they work? What features should you look for?
Let’s find out!
*Disclaimer: This page contains affiliate links. As an Amazon affiliate, this site earns a small commission for all qualifying purchases.*
How to Cut Crown Molding with a Miter Saw
Cutting crown molding can seem very overwhelming at first, but this daunting task is actually quite simple with the right tools.
The quick, clean cuts made possible with a compound miter saw makes an otherwise impossible task seem easy.
Miter saws allow you to make accurate cuts at different angles quickly. When you have several yards of crown molding to cut and install – you definitely don’t want to be trying to cut them all by hand!
Compound miter saws allow the head and blade to be rotated at a variety of angles, allowing for much more than just 90-degree cuts.
The most challenging part of cutting and installing crown molding is inarguably the corners.
Getting two complete pieces of molding to fit together (such as for a long wall in a home with an open floorplan) isn’t as tricky as trying to piece together how and what to cut to create both inside and outside corners!
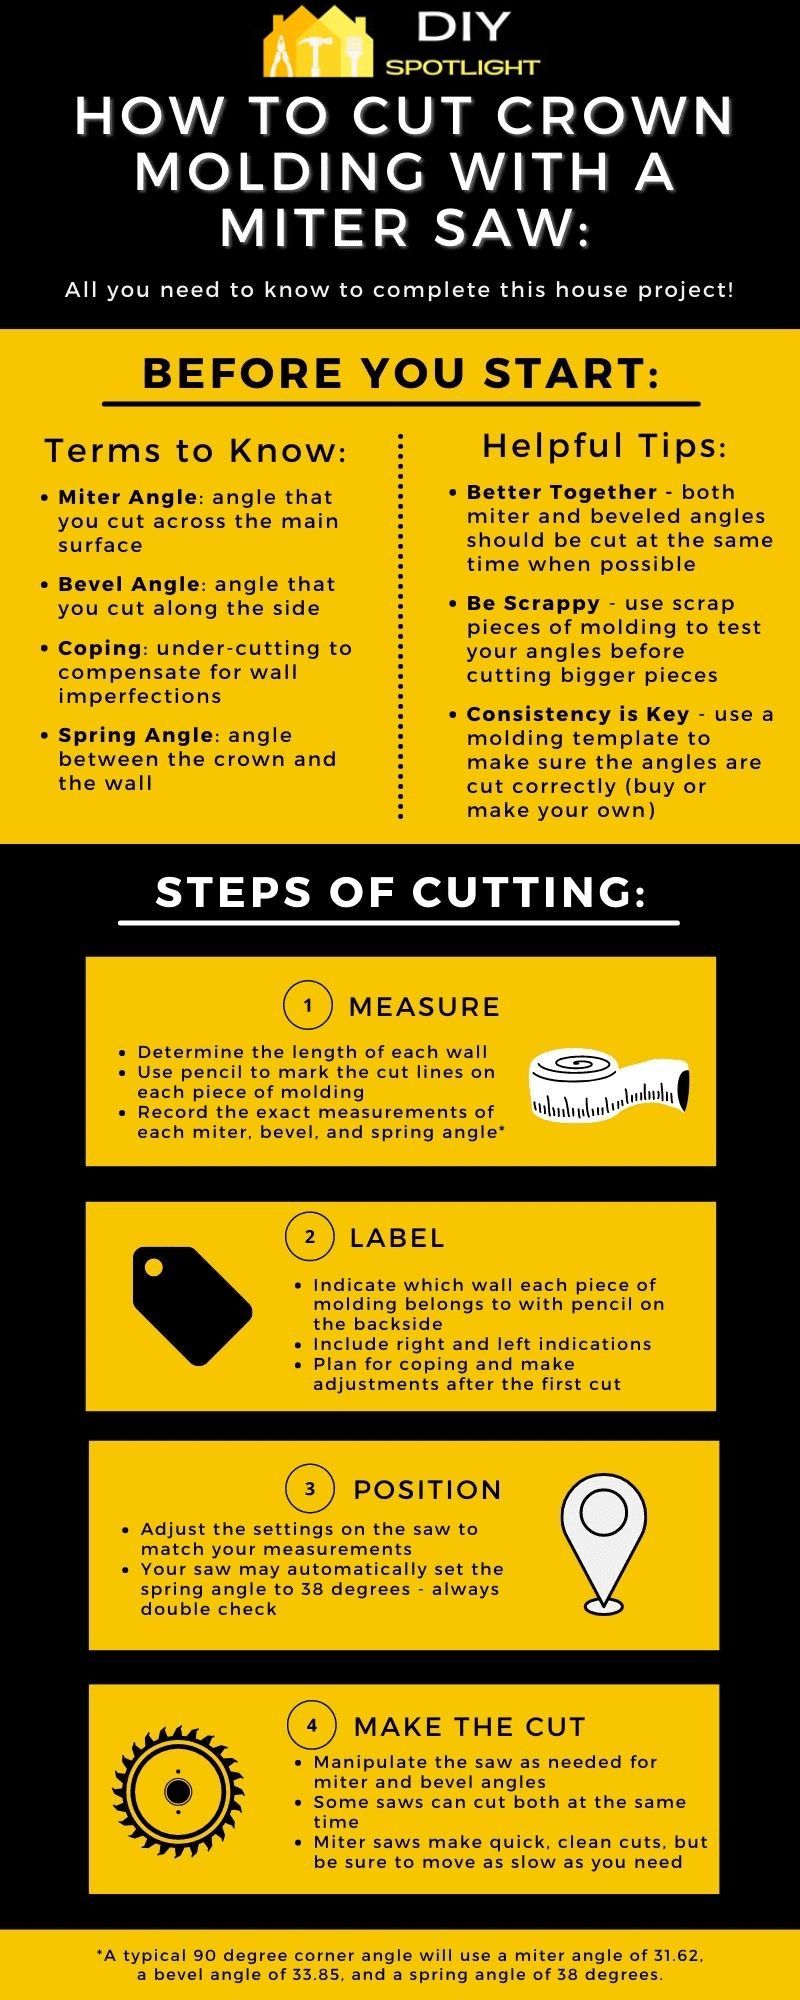
Each corner of your home requires both a miter and a bevel angle of molding to be cut. Accuracy when making these cuts is essential, and they should ideally be done simultaneously for precision.
Compound miter saws allow both miter and bevel cuts to be done at the same time by manipulating the saw a certain way.
Going a step further, compound miter saws with a dual-bevel feature make the work even easier with the ability to tilt both left and right, eliminating the need to reposition your trim piece and readjust the angles. (See the end of this article for reviews of some top-rated compound miter saws)
Assuming a 90-degree angle between your walls, the typical standard measurements for your cuts will be 33.85 for your bevel and 31.62 for your miter.
It is always a good idea to check your cuts and angles on a few scrap pieces of molding to ensure they fit your room.
It also doesn’t hurt to make a few practice cuts if this is your first time learning how to use a miter saw!
Always follow your device’s specific operating and safety instructions and wear protective eye gear when making your molding cuts.
Note: Some woodworkers will stress the need for “coping” or under-cutting your molding to fit at any odd angle that might be in your home.
Due to framing errors, drywall compound buildup, and other construction variables, many walls do not meet at a perfect 90 degrees.
However, for a simple home DIY project, you are probably safe to start assuming a 90-degree angle and make any needed adjustments.
Even with a perfect fit, weather changes can still cause gaps in your miter joints, so it may not be worth your trouble to spend much time trying to learn the coping method or trying to measure and calculate the perfect angles for each corner in your home.
Crown Molding Templates For A Miter Saw
When you are cutting crown molding with a miter saw, the measurements and settings needed to get it all just right can be very confusing and overwhelming.
To top it all off, inside and outside corners are cut with different settings. Templates help provide a visual guide for each piece and what to do when.
Crown molding templates are small precut pieces of molding that are labeled and can then be copied for each necessary cut.
You can buy them premade or cut your own using scrap pieces of trim.
You’ll want to make sure the template you use matches the spring angle of your molding. Spring angle – or the angle between the crown and the wall – can vary, but the most common is 38 degrees.
Some miter saws come pre-set to the settings needed for a 38-degree spring angle.
You will need four templates: outside corner right, outside corner left, inside corner right, and inside corner left.
As mentioned, the standard bevel is 33.85, and the standard miter is 31.62 for a 38-degree spring angle molding.
If you want to cut your own templates, check out this great visual guide.
Cutting Crown Molding Outside Corners with a Miter Saw
Your outside corners are the pieces of molding used for the junctions of walls that jut out or transition to other rooms.
For example – hallways or entryways. When your cut pieces are laid flat on the table in front of you, you can’t see the cuts – only the face.
Having your templates ready will help a ton when it comes to keeping it all straight.
The exact cutting method will depend very much on which type of compound miter saw you have, whether you have a sliding saw, are using the fence or the flat, and whether or not your machine is dual-bevel all make a difference in how the cuts are made.
- Measure each wall in the area you are installing the molding in
- Label each piece of molding on the backside with a pencil
- You’ll want to include whether each piece is left or right and the desired length
- Position the molding in the saw as desired for flat or fence cuts
- Manipulate the miter saw as needed for the bevel and miter cuts
Cutting Crown Molding Inside Corners with a Miter Saw
Inside corners are used for the corners of connecting walls within the same room. When your cut pieces are laid flat on the table in front of you, you will see the exposed edges and cuts.
Having your templates ready will help very much in not getting mixed up.
The exact cutting method will depend very much on which type of compound miter saw you have.
Whether you have a sliding saw, are using the fence or the flat, and whether or not your machine is dual-bevel all make a difference in how the cuts are made.
- Measure each wall in the room you are installing the molding in
- Label each piece of molding on the backside with a pencil
- You’ll want to include whether each piece is left or right and the desired length
- Position the molding in the saw as desired for flat or fence cuts
- Manipulate the miter saw as needed for the bevel and miter cuts
Top-Rated Compound Miter Saws for Crown Molding
If you’re only doing a room or 2, and don’t plan on using your saw for many more projects, you’ll probably want to stick with the basics – and stay within your budget.
But if you have many rooms to complete or anticipate that you may need this type of tool again in the future, you may not mind a splurge to get the best of the best.
Then, of course, there are also many options in the middle, which provide some premium features at a good price.
Read on below for a few different compound miter saw reviews and how they stack up for cutting crown molding!
DWS779 12-Inch Double Bevel Sliding Compound Miter Saw
No products found.
With its 15-amp motor, speed of 3800 RPM, and ability to cut materials of up to 6 3/4 inch thickness – the DEWALT DWS779 is an excellent value for woodworkers of all skill levels.
Purchasers agree that the DWS779 makes accurate cuts, is easy to use, and is well-built and durable.
This model is also powerful yet quiet. Reviewers also praised this model’s sophisticated dust collection system, which captures up to 75% of the dust.
Another notable advantage of this particular saw is DEWALT’S excellent 3-year limited warranty.
This model’s exclusive design allows for easier cuts of molding. Its tall back fence accommodates crown molding up to 7 1/2 inches nested and base molding up to 6 ¾ inches.
The DWS779 miters 60 degrees to the right and 50 degrees to the left, and the integrated CUTLINE Blade Positioning System allows for smooth and precise cuts.
As a sliding compound saw, this model can handle thicker trims with no problem.
With a double-bevel feature, molding cuts are even quicker and easier without having to reposition your trim and angle to make the second cut.
Overall, a saw of this caliber should make quick work of any trim-cutting project.
Our testers had very few complaints.
Some found it a bit too large and cumbersome for their tastes, or heavier than they expected. They asked me to let you know that you should mount the saw to a DEWALT miter saw stand if you anticipate transporting it often.
No laser guidance system exists, but an LED shadow light can be added for around $70.
The quick addition of DEWALT’S signature XPS guide light (if desired) essentially converts this saw into the newer DWS780 model.
Overall, the DEWALT DWS779 is a perfect miter saw for the money and an excellent choice for your crown molding projects.
Check out our full DEWALT DWS779 review here!
Metabo HPT C10FCGS 10-Inch Compound Miter Saw
No products found.
This cheaper option still packs a powerful punch. Its 15-amp motor can produce up to 5,000 RPM.
My testers praise this saw for having excellent precision and versatility in its price class.
Although it is a basic model, this saw still comes with its own dust collection bag to cut down on the mess.
And unlike some deluxe saws, the Metabo HPT C10FCGS is lightweight and easy to transport.
While not a dual-bevel machine, the C10FCGS still offers a 0 to the 45-degree bevel range to the left and a 0 to 52-degree miter range to the left & right, making it adequate for most amateur crown molding projects.
But of course, as with anything else – you get what you pay for. This model’s short fence can only handle trim less than 3” high, and all others will need to be cut on the flat instead of vertically.
As can usually be expected from a lower-priced product, we noticed some quality or longevity issues.
It also lacks features common in more expensive saws, such as laser guidance, dual-bevel cuts, and sliding rails.
In short, if none of the pricey frills matter to you, and you only need a compound miter saw for the occasional project, the Metabo HPT C10FCGS is still a solid, top-rated budget option.
Bosch GCM12SD 12-Inch Compound Miter Saw- OUR WINNER
No products found.
The Bosch GCM12SD is well-made and easy to use, with a 15-amp motor capable of producing 3,800 RPM.
We love its axial-glide system, space-saving design, and effective dust collection. As a sliding compound saw, this model can easily cut materials much thicker than non-sliding models.
This prestigious saw has a reputation as a solid workhorse that will last. My team loves its accurate, precise cuts as well as its quick-release fence.
This model’s glide mechanism helps make cuts smooth, clean, and accurate.
Many features make the GCM12SD ideal for crown molding projects. Trim cutters liked that the bevel adjustment is located in the front, saving time when making many cuts.
This model can cut any size of molding, and optional “crown stops” can assist in cutting molding.
With a horizontal cutting capacity of 14 inches and a tall fence accommodating up to 6 1/2 inches for vertical cuts, there’s no piece of trim that wouldn’t fit in this model.
With the dual-bevel feature, you can make compound cuts in both directions without turning the molding over.
Regarding disadvantages, according to some of my guys, you may want to change the blade or upgrade it for certain jobs like finishing work.
Also, the GCM12SD is heavy, weighing in at 65 pounds.
You are definitely going to want a miter saw table or stand with wheels if you plan on ever moving this thing around.
Overall, this model is an excellent option that should last you many years and many projects to come.
As one of my guys noted, with this model, Bosch has “thought of everything.”
For serious woodworkers or anyone else who wants the best of the best – you can’t go wrong with the Bosch GCM12SD.
Wrapping it Up
The task of learning how to cut crown molding with a miter saw might seem daunting at first. I know. I’ve been there.
But with the right tools, the right templates, and the right knowledge – this massive home improvement project will be completed in no time!
Until next time…ciao for now!
Related Posts:
Best Cordless Miter Saw Authority Guide 2022
DEWALT DW713 Compound Miter Saw Review
Festool Kapex KS 120 Miter Saw Review 2021
Makita LS1040 Compound Miter Saw Review 2021