Updated 3/8/2023
Pressure washing is generally considered a mandatory first step for anyone planning to repaint or refinish the exterior of their home- so it pays to know how to pressure wash a house.
Properly cleaning the exterior surface is crucial to ensure proper adhesion of any new coatings or sealants and is an important part of the preparation phase when planning your project.
Power washing (also often referred to as “pressure cleaning”) is primarily used to remove dirt, mildew, loose paint, chalk residue from deteriorated coatings, or any other foreign contaminants that must be removed, such as spider webs, hornet nests, etc.
Power washing can also be used to remove stains, imperfections, and weathered patinas from wood that require a clear coating or a semi-transparent stain.
Power Washing is Necessary for Quality Work
When done correctly, these specifications are essential to a quality job. If you are repainting your house, this first step in the surface preparation process serves more of a mechanical function by providing a good surface for adhesion.
Knowing how to do these various steps correctly is essential to doing a good job.
But even more important is knowing what the correct procedures are in the first place and what to look out for as precautions.
In this article, I’ll provide you with some helpful tips and tricks for some of the more commonly seen problems and issues when it comes to power washing your house.
How To Remove Dirt and Mildew When You Are Repainting

When the exterior of a structure is being repainted, the primary objective for pressure washing the house is to remove dirt, mildew, loose paint (this applies to masonry surfaces only), and any other contaminants, as discussed previously.
By using the term repainting, I am referring to the new application of an opaque or solid coating.
Paints, elastomeric coatings, and solid-bodied stains all fall into this category because they are coatings that you cannot see through once they are dry.
Examples of coatings that are not opaque or solid would be clear sealers, varnishes, semi-transparent stains, and semi-solid stains.
Again, this is because you can see through the new coating to varying degrees once it has dried.
This requires greater care and attention to how the substrate is cleaned and what it looks like before it is recoated. More on this later.
The correct specifications for pressure washing a house that is to be painted are much simpler and require less attention to detail than when looking to refinish a surface with a clear sealer.
However, there are still some important rules to follow if you want to get a good job.
None of these procedures are difficult or expensive to do, but skipping over any of these steps could have a big impact on how long before you have to repaint again.
Mildew- A Living Airborne Organism
The first objective should always be with the removal and the killing of all live mildew spores.
Mildew is an airborne fungus that requires oxygen and water to grow. Pressure washing without chlorinating first makes the surface look clean and mold-free.
However, without the use of chlorine and detergents, the risk is very high that live mildew spores will still be present on the walls or overhang.
It gives the appearance of being clean and ready for paint when, in reality, it is not.
The proper method for removing mildew and killing the spore itself is to chlorinate first using a solution of water, bleach, and detergent.
This solution’s strength depends on the severity of the mildew to be removed.
It also depends on whether you are running the bleach solution through a pressure washer or with a pump-up sprayer.
Power washers have a siphon tube attachment known as an injection tube or as a pick-up tube. Its purpose is to pick up the bleach and detergent from a bucket and mix it with the water coming out of the tip at the end of the wand.
This method of application generally works fine for all normal mildew growth.
An important yet little-known fact is that with most pressure washing machines, the bleach can be diluted at least 10 to 1 with water by the time it reaches the wall you are trying to chlorinate.
This weaker solution should be enough for most mildew problems but will not be adequate in circumstances where mildew is heavy and very noticeable.
In these situations, using a straight solution of bleach and detergent applied with a pump-up garden sprayer is usually the best approach.
Let The Bleach Do The Work For You
Remember, let the bleach do the work for you. Once it has visibly killed the mold and mildew, then it’s safe to proceed with the rest of the pressure washing.
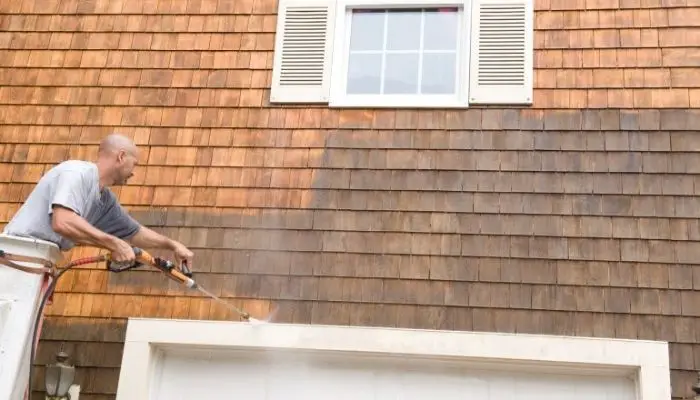
Why Wood Siding Requires A Different Technique
Earlier in this article, we looked closely at the importance of chlorinating and cleaning your home before painting.
The tips and methods outlined were primarily focused on identifying mildew and how to effectively kill the mildew spore before pressure washing so as to stop it from immediately returning and causing problems with the new coating.
These procedures were directed at homes that are going to be repainted. The steps and the procedures for chlorinating a wood surface, such as wood siding, are much different for many reasons.
Understanding why refinished wood should be cleaned differently will make perfect sense by the time you finish this article.
As you may recall, anytime a surface is being recoated with a clear finish or any type of semi-transparent stain, the finished product will only look good if the substrate looked good before it was coated.
The reasons for this should be obvious because a clear or semi-transparent finish can be seen through.
With a wood or masonry surface that is being recoated with standard paint, less care is needed when cleaning because it will be covered.
A scorched earth approach can be applied to the killing of mildew when you repaint, but it will not work when dealing with the various sealers and stains typically used for wood.
How To Properly Chlorinate Wood Siding
Now that we understand the reasons for treating these wood surfaces in a different way let’s check out the correct method to use so that your end result looks professional.
Wood siding or any exterior wood surfaces will typically have a variety of visible stains and flaws that will range in varying degrees of severity.
The most common will be mold and mildew, gray weathered patinas, and corrosion or rust stains from fasteners.
Some of these stains cannot be removed 100% of the time. The success or failure in removing these flaws depends on the length of time since it was last refinished and other factors.
A flawless finish is not always possible, but you can certainly make it look much better than it did, and in most cases, you can make it look fabulous.
My suggestion is always to clean and rinse a small sample section first.
Let it dry, and then seal or stain it with the product you intend to use. Then you can make a determination as to whether it is acceptable or not.
I will list the key points for chlorinating and cleaning wood below with explanations and descriptions for each.
Again, none of this is rocket science, and none of these methods are challenging to do. But they are important nonetheless and come from years of experience.
High-Pressure Washing vs. Low-Pressure Washing
High-pressure washing is never a good thing when it comes to wood. It’s OK to still use a power washer, but the machine should be used more like a heavy-duty, glorified power rinse rather than a cutting tool.
The typical technique of bearing down on wood with a power washer is an improper technique.
It should be avoided because it can damage the wood and possibly force water into areas that cannot properly drain.
The correct method is to use low-pressure methods for both the application of bleach and the rinsing process.
Power Washer vs. Pump-Up Sprayer
For wood siding or overhangs that appear to be in good shape with very little mildew or weathered stains, a pressure washer using a pick-up tube for the bleach solution will work just fine in most cases.
However, if the siding is noticeably flawed with lots of mildew, then a pump-up sprayer will do the best job.
As we talked about before, when using the pressure washer’s pick-up tube for drawing the bleach from the bucket, it will be diluted at least 10 to 1 by the time it comes out of the tip.
Using a pump garden sprayer lets you control the solution’s strength.
Normally, I recommend a 50-50 mix of water with store-bought bleach and a small amount of TSP substitute for detergent when using the garden sprayer.
If the wood is in really bad shape, or if the 50-50 mix is not removing the mildew within 20 minutes, switch to full-strength bleach.
The TSP substitute can be purchased at any paint store and at most hardware stores. Painters have been using it for years, and it’s very inexpensive.
Just follow the directions on the box, and you’ll be fine.
Bottom to Top, Bottom to Top, Bottom to Top!
Applying the bleach solution from bottom to top is the most important, no-compromise rule to follow if you intend to finish your wood siding with a clear semi-transparent finish.
When you apply the bleach solution from bottom to top, you eliminate the risk of streaking because the bleach solution can only drip and run onto a previously wetted surface.
If you were to apply the bleach from the top down, it would end up running and dripping onto a dry surface and will probably streak and stain the wood, leaving very difficult or impossible flaws to remove.
I can’t stress enough the importance of this simple but very important approach, and if I could add anything to that, it would be to go from corner to corner as well.
So, to recap, it’s bottom to top and corner to corner!
Putting It All Together
You should have a much better understanding of how to remove mold, mildew, and weathered patinas from wood siding properly, enabling you to turn back the clock on the aged-looking wood finish of your home.
Power washing and properly cleaning the exterior of your house are important first steps in the preparation phase for repainting your home.
The benefits and the reasons for pressure cleaning are removing dirt, mildew, and loose paint prior to the application of new coatings.
Once you have properly chlorinated and cleaned the exterior using the abovementioned techniques, you are ready to move forward with the power washing phase.
Selecting The Correct Pressure Washer Nozzle
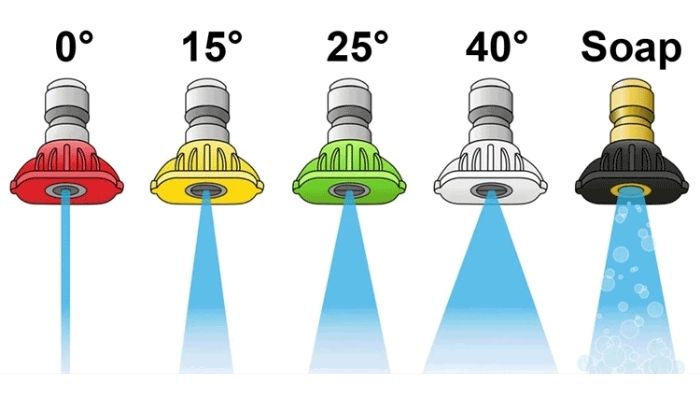
Now let’s talk about the correct steps to take and some important considerations you need to be aware of when selecting the correct pressure washer nozzle.
Your power washer will have a gun with an extension wand for directing and targeting the water or solution to the areas to be cleaned.
At the end of the wand, you will find a coupling for attaching the correct pressure washer nozzle to be used.
Listed below are the standard tip sizes and when to use them!
0 Degree Pressure Washer Nozzle
This is the most powerful and potentially damaging tip with your machine.
Also known as a bullet tip, this tip has a round and tiny orifice, which creates the greatest concentration pressure per square inch.
It is to be used only in circumstances requiring extreme cutting power, as it can leave unsightly grooves and holes in soft cement and wood.
Before using this tip for the first time, stand back and practice with it so that you can better gauge where and how to use it.
15 Degree Pressure Washer Nozzle
This size tip is the preferred tip to use in most cases. It has excellent cutting power for removing loose paint without easily scarring or damaging the surface.
Once the chlorinating phase has been completed, the 15 Degree tip is used 95% of the time by professionals.
25 Degree Pressure Washer Nozzle
With a slightly larger orifice and wider fan, this tip can be used when cleaning softer substrates or wood.
Generally, it is only used when the 15 Degree tip seems potentially damaging to the substrate being cleaned.
40 Degree Pressure Washer Nozzle
This tip is even weaker than the 25 degree tip. Rarely used, it works best in situations requiring a strong rinse with no real cutting power.
Chlorinating Tip
When using the siphon or pick-up tube for chlorinating, this tip is extremely important for adequate siphoning.
The large orifice allows enough water to flow through the wand for siphoning.
Once this phase is complete and the mildew has been removed, you can switch to another tip, usually a 15, for the actual pressure washing.
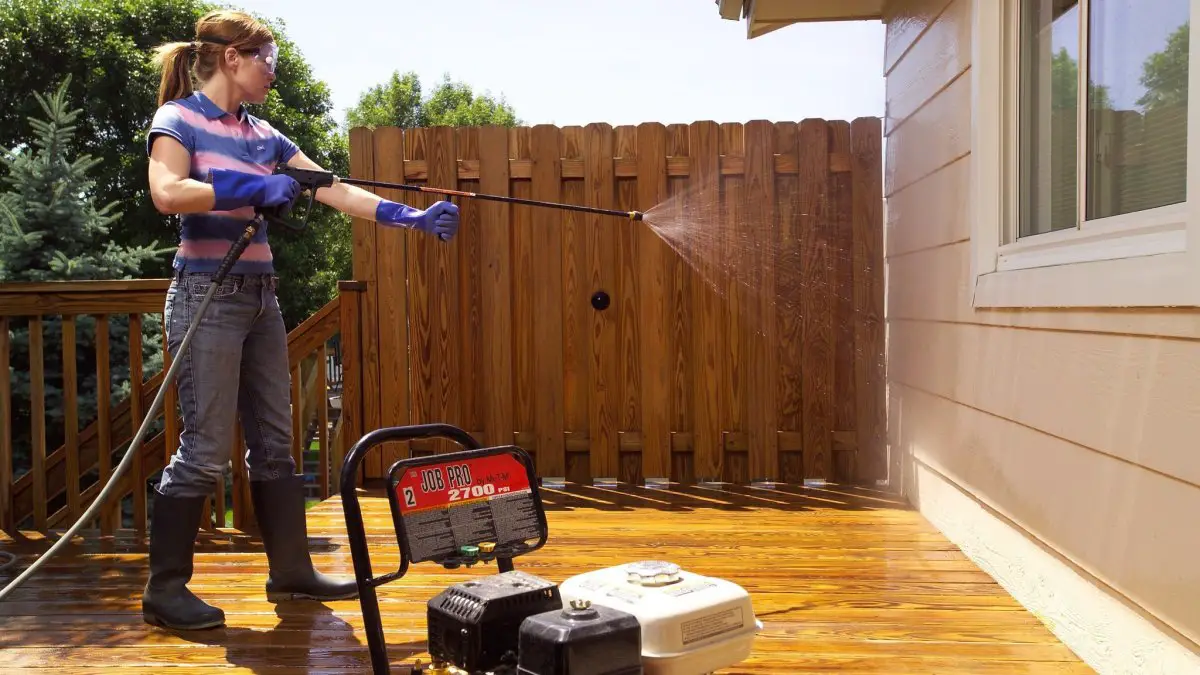
Proper Pressure Washing Technique and Safety
When pressure washing your home, stand back from the wall and start off slowly. A deliberate, even pattern covering the entire surface is best.
Your goal is to remove loose paint, chalk, dirt, mildew, and any other contaminants that could affect the finished product.
Take extra care around windows, doors, or vents where potential damage could occur.
Protect fragile plants and landscaping so that potentially damaging high-pressure water doesn’t come near them.
This is especially true when using bleach during the chlorinating phase.
Bleach will kill fragile plants and flowers, so always protect and rinse your plants.
Additionally, many safety precautions should be considered. Please follow the safety recommendations provided with the machine you are using.